Search

OZ HAB

Near Space Project

Tag

high altitude

Launch video and data of OZHAB01

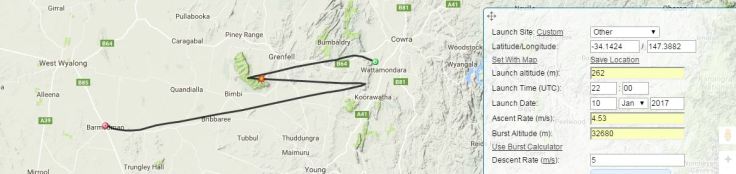
Here’s the video of OZHAB01 being launched from Barmedman  NSW as well as other data I have collated so far

Unfortunately I have not yet recovered the payload of OZHAB01 so I am unable to provide any of the on board collected data. However I do have some flight data that was collected via APRS and the RTTY transmitter which gives a good indication of the flight progress.
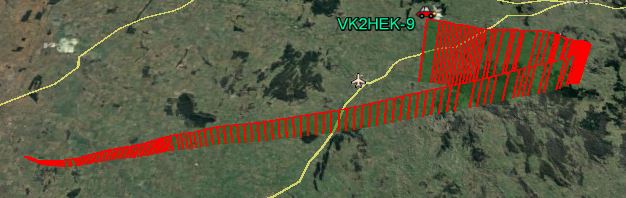
The APRS was being received by digipeaters around 1000m and continued to have contact until it burst about 31000m. APRS Google Earth KML OZHAB01

aprs-altitude
Elevation Profile
aprs-flight
Flight from Launch until bursting

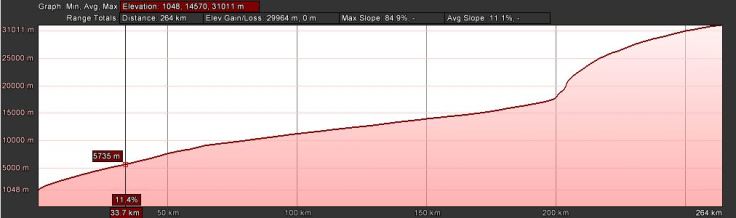
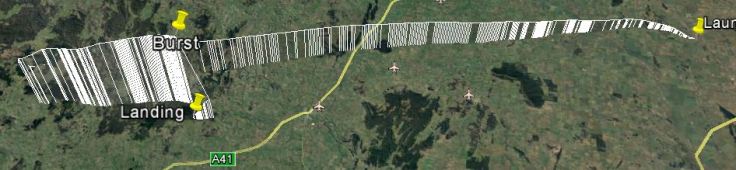
The RTTY was decoded on my laptop as I chased the balloon and followed the same path as the APRS. I did loose signal a few times as it was climbing to its burst altitude. RAW KML of RTTY Flight for Google Earth

rtty-collected-data-kml

Post Flight thoughts for next time

  • Ensure I pack a highly directional antenna to locate the payload.
    • Something with variable attenuation would be great.
  • Use a weight instead of digital scales to determine correct lift and helium dosage.
    • The digital scales were difficult to read as the wind blew the balloon around, which lead to less helium in the balloon and a slower ascent.
  • Cut balloon away when approaching max altitude to ensure a cleaner descent.
    • As I haven’t recovered payload yet, I don’t know how much balloon was intact and this could have impeded the parachute
  • Don’t forget the tarp next time.
    • Blankets worked , but were too small
  • Improve my APRS decode.
    • APRS was decoding sporadically.
    • I didn’t have an app installed that would upload the APRS data to the web

OzHAB1 is Go for launch

After a long wait, the day has finally come where I hope to have a successful launch of my first ever Arduino based High Altitude Balloon project.

My launch approval has been granted through CASA and my NOTAM has been issued for Wednesday morning 9am / Tue 10pm UTC.

notam.jpg

The approval process was a lot easier than I had expected. I ensured that I provided all the information required from the regulations for a light balloon and the rest was easy.

I’m currently camped out at the launch site in Barmedman NSW where it must be at least 30 degrees C, so its going to be a hot night. Not going to make sleep easy when I’m rattling all the things of forgotten to bring through my head.

pred.JPG

The predicted flight looks straight forward and as long the transmitters hold out, I should get some good results.

I’ll have a APRS tx on 145.175 , and RTTY on 433Mhz.
As long as I have mobile reception I should be able to upload to https://tracker.habhub.org/  or http://aprs.fi


Fitting Cameras in payload

Decided to use a Styrofoam Esky (Cooler, some people may call it) to house my payload. The small Esky usually stores up to 6 cans of soft drink so its noesky
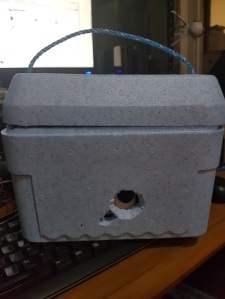
t overly large. Its also very easy to cut through to make holes for the camera gear. I still need to work on the final attachment to the parachute as the esky comes pre-fitted with a rope tied lid. I will most likely replace the provided rope with my own and add an additional two points to provide more stability during the flight.


I started by cutting a hole for the Go Pro which will hopefully record a video of the flight. The other small hole is for what I think is the light sensor. I will need to make a few more adjustments to get the hole size right, as the Go Pro has a wide angles lens and I can still see the Esky in the shots.

I have also cut another hole in the bottom of the Esky to allow for a second camera. The 2nd camera is my cheap 1080P camera and will be set to take a still shot over 5 secs.

camera-in-esky
Camera’s in final positions

I am hoping that if I connect the cameras to an external battery that I will be able to extend the battery life. This seemed to work in my initial tests, but I am currently retesting to ensure I can get at least 3 hours of battery life.
I don’t really want to purchase a Go Pro Back pack battery if I don’t need to.

I will be placing some additional foam around the cameras to keep them in place, but have discovered that having the USB cables attached make it more difficult to get the foam to fit.  More cutting and adjustment needed.

esky-foam
Foam insert to keep things in place

The camera’s seem to be locked in tight and I can shake the payload and they don’t budge.

The Go Pro looks good to go (except for battery life), its more a power-on and hit record,  whilst my other camera seems to revert to some basic setup when I turn it on , so I have to reset everything to how I need it for the  flight. During a recent test, I thought I was recording a still every 5 secs but instead it was videoing, it wouldn’t have been too bad provided the battery life lasted.  So I’ll be researching to see if I can save the config somehow to save time and fiddling at launch.

Don’t let me freeze

The air temperature at higher altitudes tends to be below freezing, thus there is a risk that the batteries in the payload won’t operate effectively. Batteries in cold climates are know to have a higher resistance and will usually become flat very quickly.

I don’t want to risk the chance of my payload loosing power, as it will certainly result in a lost payload.


One solution is to choose batteries that function better in cold climates. According to battery university all batteries are impacted by the cold, however some handle it better than others. Certain NiCad and Lithium Ion Batteries can still operate at -40 Degrees C but at a reduced discharge.

So to attempt to keep the payload at a warmer battery friendly temperature, I am considering some air activated toe warmers, the type you place in your ski boots when in the snow.

 These toe warmers can reach 40 Degrees C, so a couple of them should keep the payload warm when its -40 outside.

I still need to test this functionality to ensure it actually works, and that camera lenses won’t fog, but I;m feeling confident.

Blog at WordPress.com.

Up ↑